This post may contain affiliate links. For more information, please visit the disclosures and privacy policy page.
Jan 31, 2013

Friday Cocktail | Elderflower Martini


Elderflower martini

The first time I tried elderflower liqueur was in a restaurant in Toronto. I wish I could remember the restaurant but I have not been very good at documenting vacations unfortunately. I really need to keep a travelogue just so that I can remember the details of the trip. I do know that we had a great time there and ate really great food. And the people were incredible.

We also hit the University of Toronto. One of the things we like to do while on vacation is, if possible, find the local university, find the bookstore, and buy t-shirts for our grandsons (we have picked up some pretty cool stuff... better than the touristy shirts, right?).  It's also fun for me because I work for a university.

We also made the day trip to Niagara Falls. Very touristy. Very fun.

St. Germain martini


But back to the liqueur. It's hard to describe. It's flowery, sort of like lavender, but not. It's sort of sweet, sort of tart, sort of citrusy, and very flowery. Unlike a lot of liqueurs, it's not too sweet. It's actually lovely straight up as a digestif.

I finally picked up a bottle of it and decided to experiment. This cocktail is very refreshing, not too girlie. If you try it, it might just become part of your Friday night cocktail rotation.

Elderflower Martini

Makes one cocktail

Ingredients

2 ounces vodka
1 ounce elderberry flower liqueur (I used St. Germain)
1 T lime juice
Sprig of mint

Instructions

Chill a martini glass in the freezer
Fill a martini shaker or large glass with ice
Add the vodka, liqueur, and lime juice
Shake and strain into the martini glass
Top with the mint sprig

Enjoy!


Norwich Sourdough

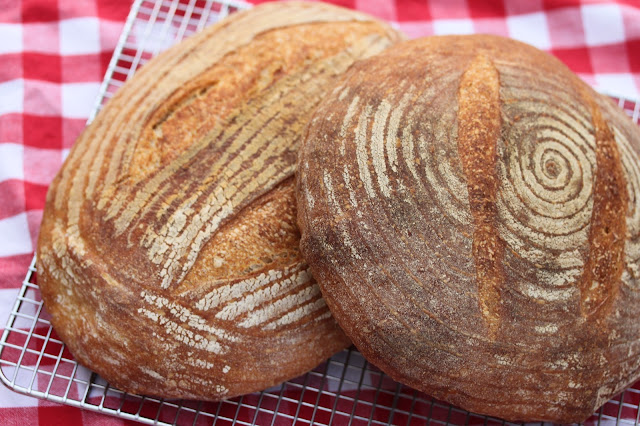
Norwich sourdough

If you saw my post about sourdough with walnuts and raisins, you know that I am "coping" with an oven that suddenly went haywire. While the problem has been diagnosed, we have to wait for a (very expensive) part. Five days and counting. This raises a few questions. To wit:

  1. Will I have to eat (gasp!!) store bough bread? 
  2. Will a cake bake in the convection roast mode?
  3. Will I finally learn how to use my convection microwave?
  4. Can I bake bread in my toaster oven?
  5. Will I need medication? 
Desperate times, people. Desperate times. 

Thank goodness I have some baking adventure photographs saved up for times like these. Like this Norwich sourdough bread. It was given this name by Susan of Wild Yeast to honor the Vermont hometown of King Arthur Flour. Susan adapted this recipe from Bread: A Baker's Book of Techniques and Recipes by Jeffrey Hamelman.  This bread is the perfect hearty everyday sourdough.

Vermont sourdough

Norwich Sourdough

Yields two two-pound loaves, or several smaller loaves.

Ingredients

900 grams unbleached all purpose flour
120 grams dark rye or pumpernickel flour
600 grams of room temperature water
360 grams fed 100% hydration sourdough starter
23 grams salt

Instructions

  • Add all of the ingredients except the salt to the bowl of a stand mixer and mix on low for about a minute.
  • Let the dough rest for 30 minutes.
  • Add the salt and mix with the dough hook for 3 to 4 minutes. 
  • Place the dough into a large oiled shallow bowl and allow to rise for 2 1/2 hours, doing two stretch-and-folds at 1/3 and 2/3 the way through (50 and 100 minutes), keeping the dough in the bowl. 
  • On a floured surface, gently divide the dough into two parts, and shape into balls. Allow the dough to rest, covered loosely in plastic wrap, for 15 minutes. 
  • Shape the dough into boules or batards, place them in floured bannetons or linen lined bowls, cover with plastic wrap, and allow the dough to rise for 2 to 2 1/2 hours. 
  • Preheat the oven with a baking stone on the second lowest rung and a broiler pan one rung lower to 475 degrees F. 
  • Turn the dough out onto a parchment lined cookie sheet or pizza peel and slash the dough. 
  • Drag the parchment onto the stone, add one cup of boiling water to the broiler pan, shut the oven door, and turn the temperature to 450 degrees F. 
  • Bake for approximately 40 to 50 minutes (use your instant read thermometer to test the dough), until it reaches an internal temperature of about 200 degrees F. 
  • Remove the loaves from the oven and cool them completely on a wire rack. 

Sharing with Susan of Yeastspotting. Head over there to see amazing breads shared from around the world. 
Jan 27, 2013

Sourdough Bread with Walnuts & Raisins

Sourdough bread with walnuts and raisins

This is great bread. I'm just saying. And, yay, I had all of the ingredients!

I was a little worried about the medium rye for a while. I have a written inventory of all of the different flours I've got in the house. Pretty organized, right? Except I couldn't find the book in which I wrote the inventory....

Sourdough bread with walnuts and raisins


I found the dark rye, the white rye, the pumpernickel. Where is the medium rye? (first world problems!). I was getting ready to combine some dark and white rye (although I'm pretty sure that's not exactly a substitute, I'm not a rye expert) but then, eureka, I found it at the bottom of the garage refrigerator, a refrigerator that was purchased specifically to support my ingredient habit. If I had more room in my garage, I'm not ashamed to say that I would add a freezer.  Fortunately, reason prevails. So far. We still use the garage for the purpose for which it was intended. Cars. Imagine that.

Sourdough bread with walnuts and raisins


There was also some additional drama. As I dumped the loaves out of the bannetons onto the baking stone, my oven began to go a little bit crazy. It suddenly insisted on baking on "convection roast" at the wrong temperature. I got it to bake (actually convection roast) at the correct temperature, but every time I opened the oven door, it would revert to 375 degrees F. I was going to spray the oven interior to add additional steam, but I was so freaked by the turn of events, that I skipped that. I did, however, fill a steam pan with boiling water.

A baker with a wacko oven? This is just not going to work. I definitely regret having just one oven (first world problems again).

Sourdough bread with walnuts and raisins


Fortunately, the loaves came out beautifully. They baked a lot faster that the recipe described. Thank goodness for the instant read thermometer. The bread was getting really brown so I decided to take its temperature. This bread was ready way before it was supposed to be. The bread actually took about 15 minutes less time to finish baking.

Interesting. While I'm not happy with the turn of events, I might actually experiment with the convection bake and roast modes once we get this beast repaired.  Now, how will we get a technician out to the house to get this thing fixed in time for some baking projects I have urgently planned (more first world problems)?

Sourdough bread with walnuts and raisins


This bread is "mixed method," which means it involves both natural yeast and commercial yeast. It takes two days to make. On the first day, I made the levain, which is made from a sourdough starter. On the second day, I mixed the levain into the rest of the ingredients. If your sourdough starter has not been fed for quite a while, feed it the day before you make the levain.

Sourdough Bread with Walnuts and Raisins

Ingredients

Levain

82 grams unbleached all purpose flour
41 grams water
66 grams sourdough starter

Dough

308 grams unbleached bread flour
119 grams whole wheat flour
47 grams medium rye flour
3/4 tsp instant yeast
13 grams salt
All of the levain
341 grams water
95 grams coarsely chopped walnuts
95 grams raisins

Instructions

To make the levain:

Add the ingredients to a one or two quart bowl and mix until incorporated. Cover the bowl with plastic wrap and ferment at room temperature for 8 hours or overnight. 

To make the bread:

In the bowl of a stand mixer, whisk all of the dry ingredients except the raisins and walnuts. Add the levain and the water. Mix in the levain and the water with a large spoon or dough whisk. Mix with the dough hook on low or "stir" for one minute. Increase the speed to the next level and mix for 15 minutes. Lower the mixer speed to the lowest level and add in the walnuts and raisins. Mix for one minute, remove the dough, and knead by hand until fully incorporated. 

Place the dough into an oiled container and allow to rise for 1 1/2 to 2 hours, until almost doubled. 

Gently deflate the dough and divide into two even pieces. Shape into boules.


Allow to ferment for about 60 to 90 minutes, until doubled. 

Bake the loaves in a 450 degree oven on a baking stone with a steam pan for 40 to 50 minutes. 

Or maybe convection roast for 30 minutes?  


This recipe is the January bread of the month (the BOM) for the Facebook Artisan Bread Baker's group is Sourdough Bread with Walnut and Raisins. Darlene posted a photo of her bread and I asked her if she was willing to share the recipe with the group for the BOM. Thank you Darlene for a wonderful contribution.
Jan 26, 2013

Ciabatta with Cold Fermented Dough


This is, in my opinion, a perfect ciabatta recipe. Look at all of that air. The dough ingredients are combined the day before (up to four days in advance) and refrigerated. The dough is about 45% water, about the wettest dough I've worked with. The gluten in this bread is developed through a stretch and fold method rather than through kneading. Here is a short video of Peter Reinhart demonstrating the method with this dough:


This dough is much easier to work with if you have a little plastic dough scraper like the one Peter is using. I got mine from King Arthur Flour (I have several, sheepish grin). It is also very helpful to use a scale to measure the flour.
Jan 22, 2013

French Apple Tart | TWD


French Apple Tart


This week the Tuesdays with Dorie group is baking a French Apple Tart from page 379 of the book Baking with Julia (as in Julia Child) by Dorie Greenspan.

I've been on vacation for a couple of weeks and wanted to make something impressive to take to my colleagues who helped keep things running smoothly.

French apple tart


Impressive, right?

This recipe involves making a pie dough, an apple puree, and an apple flower thingy on the top of the puree. I made this tart all at once, but you can make the pie dough and apple puree in advance and assemble the whole thing a couple of days later. In fact, the dough is freezable.

I followed this recipe pretty much as described in the book. Each bake in the oven took longer that the author described, but that seems to be a pattern with this book. (Although I've checked it, I may need to re-check my oven's temperature...) The one thing I did differently, which was probably not necessary, was to brush the top of the tart with an apricot glaze. I was a little worried that the apple slices were too dry from the extended baking.

The dough is really flaky and contains no sugar, so the contrast between the dough and the apple puree is just amazing.


So here's how it's done...

Make a really flaky savory dough and blind bake it (cover it in parchment and fill with rice, dried beans, or pie weights) in a nine inch tart pan.

Make an apple puree with roasted apples... really just homemade chunky applesauce. I kept mine really chunky.

Spread the puree in the dough lined tart pan.

Top with a floret of very thinly sliced apples.

Bake until the edges if the apple slices are kind of burned.

Cool, sprinkle with powdered sugar, (or in my case, spread with an apricot glaze), slice, and enjoy.

To make the optional apricot glaze, melt apricot jam with apple juice or cider, and brush over the apples after removing the tart from the oven.

As a side note, this pie dough was so easy to work with. It is a mixture of pastry flour, salt, butter, chilled shortening, and ice water. It requires very little handling and is amazingly, amazingly flaky. The only issue is that without the addition of sugar, it takes longer to brown.

To see the actual recipe, visit Laws of the Kitchen.

I am definitely making this again.

Jan 19, 2013

Chocolate Chocolate Chip and Coconut Shortbread Cookies

Chocolate shortbread

I know, I know. These look like brownies. They are actually shortbread cookies that contain some leavening, which is probably why they have this brownie "look." I probably should have cut them into triangles to make them look more shortbread-y. Nevertheless....

chocolate shortbread


These are tasty and super easy. Think deep rich chocolate with the subtle nutty flavor of coconut. They were a big hit in my house.... and there were very few dishes to wash.

chocolate shortbread

Recipe notes:
I used King Arthur Flour's Double-Dutch Dark Cocoa, which gives these cookies their deep color, but any Dutch process cocoa will work with this recipe.

I also used my (clean, thank you very much) hands to combine the dough even though the recipe suggests stirring the dough, because the dough would not come together when mixing with a spoon.

I used French fine sea salt that I picked up at Surfas Culinary District in Culver City (I love, love, love Surfas) when taking a bread baking class. This salt is amazing, but I'm sure it's not necessary. I just like to justify having purchased specialty ingredients.

chocolate shortbread

Chocolate Chocolate Chip Coconut Shortbread Cookies

Ingredients


1 C unsalted butter, at room temperature
1 tsp salt
1 C sugar
1/3 C (1 oz) Dutch process cocoa
1 tsp vanilla extract
1/2 tsp baking powder
1 3/4 C (7.25 oz) unbleached all purpose flour 
1/4 C mini semi-sweet chocolate chips
1/4 C finely chopped sweetened or unsweetened coconut

Instructions

  1. Preheat the oven to 300 degrees F.
  2. Grease one 9 inch by 9 inch square baking pan.
  3. In a medium bowl, cream the butter, salt, and sugar.
  4. Add the cocoa, vanilla, baking powder, and flour, and mix until you have a fully blended stiff dough. This is where I used my hands. 
  5. Add the chips and the coconut and mix. 
  6. Press the dough evenly into the pan and prick liberally with a fork.
  7. Bake the shortbread for 50 to 55 minutes.
  8. Run a thin knife or spatula around the edges of the pan to separate the dough from the sides.  
  9. Cool in the pan for 5 minutes.
  10. Place a piece of parchment, plastic, or wax paper on top of the pan, and flip it over onto a cutting board. 
  11. Cut the shortbread into 25 squares (a pizza wheel works nicely) while still warm (it will be too crispy if you wait until it cools).
  12. Cool the cookies on a cooling rack. Enjoy!
Recipe adapted from King Arthur Flour. The basic formula originally appeared in the book, King Arthur Flour Cookie Companion


Jan 18, 2013

Panettone Muffins

panettone muffins

ABC? The Avid Baker's Challenge. This year the group is baking twelve recipes from the King Arthur Flour website. I'm all over that. Do I like King Arthur Flour? Given my addiction for buying their ingredients....  


Let's talk about my pantry...  I just happened to have all of the ingredients, including the Fiori di Sicilia, a flavoring for Panettone. 


panettone muffins


Making panettone, an Italian Christmas bread, can be quite a challenge. The recipe I've used involves a sourdough starter and a nine hour rise. These muffins borrow the flavor of panettone while taking only a couple of hours from start to finish with less than 30 minutes of hands-on time. 

The recipe has a couple of options. I used a combination of raisins and dried cranberries for the fruit, and soaked them in rum after heating the mixture in the microwave (you can either heat the fruit and liquid to use the mixture on the same day, or simply soak the fruit overnight without heating it). I also added the optional cake enhancer because I had it on hand. I baked the muffins without paper muffin tin liners and they fell out of the tin without sticking. 


panettone muffins

Verdict? Really good. Really easy. A little taste of Italian celebration bread. Oh, and they are really nice warmed. 

You can find the recipe here on the King Arthur Flour website. You can check out the other Avid Bakers' takes on the recipe here

Enjoy!
avid baker's challenge

Jan 14, 2013

Struan | A Multi-grain Bread

Multi-grain bread struan

According to Artisan Breads Every Day, this is Peter Reinhart's favorite bread. He says that he publishes a new version of this bread in every new bread book that he writes. The bread is considered a "harvest bread" because it contains whatever grains are available from the harvest from the day before. The recipe is flexible, and you can substitute multigrain cereals for some or all of the different grains listed here. For the cooked brown rice, I substituted some leftover basmati rice made with ras el hanout I had made the night before.

Multi-grain bread struan

This bread makes wonderful toast and sandwiches, and you can even add some sourdough starter to add a boost of flavor. I can understand why this bread is Peter's favorite.

By the way, if you are interested in getting into artisan bread baking, definitely pick up this book. It's just amazing how dedicated the author is to fine tuning the bread baking experience. Peter has taken many of the recipes that he has published in the past and perfected them. The formulas are pretty foolproof. I have not been disappointed in any of the breads in this book that I have tried.

And get a scale. You'll wonder how you baked without one.

Multi-grain bread struan

Struan


Makes two loaves. Days to make: two. Adapted from Artisan Breads Every Day by Peter Reinhart. 

Ingredients

22.5 ounces (5 cups) of bread flour
1.5 ounces (1/4 C) of coarsely ground cornmeal
1 ounce (1/4 C) rolled oats
3 T wheat bran
1/2 C cooked brown rice
1/4 C brown sugar
2 1/2 tsp salt
2 T instant yeast
1 1/2 T honey
1 1/2 C lukewarm water (about 95 degrees F)
1/2 C lukewarm milk
4 ounces of 60% sourdough starter (optional)
Poppy seeds and sesame seeds to top the bread (optional)

Instructions

Day One:

  • In the bowl of a stand mixer, combine all of the ingredients except the seeds in the bowl of a stand mixer and mix on the lowest speed with the paddle attachment for two minutes and then let it rest for five minutes.
  • Mix again on low for two more minutes. The dough should be soft and tacky/sticky. If it's too wet, add a little more flour. 
  • Transfer the dough to a floured surface, sprinkle it with flour, and knead by hand for about three minutes. If necessary, add flour to prevent sticking. Form the dough into a ball. 
  • Reach under the dough with a dough scraper and an with an oiled hand on top, stretch one side of the dough out and fold it over the top of the dough. Repeat on all four "sides" of the dough ball. 
  • Form the dough back into a ball and place it in an oiled bowl and allow it to rest, covered, for ten minutes. Repeat three more times, every ten minutes. 
  • Place the dough into an oiled bowl, cover with plastic wrap, and place it in the refrigerator overnight, and up to five days. 

Baking Day:

  • About two hours before you plan to bake the loaves, take the dough out of the refrigerator and shape into two loaves and place into oiled 8 1/2 by 4 1/2 inch loaf pans. 
  • Spray the tops of the loaves with water, then spray oil, and then sprinkle with the seeds. Cover with plastic wrap. 
  • Let the dough rise for 1 1/2 to 2 hours until the dough has risen about one inch above the rim of the pan. 
  • Preheat the oven to 350 degrees F. 
  • Bake for 45 to 60 minutes, rotating after 20 minutes. The bread is done when the internal temperature reaches 185 degrees F or higher. 
  • De-pan the loaves and cool on a wire rack, at least one hour. 

Jan 12, 2013

Homemade Gingersnaps

homemade gingersnaps

This cookie is made with three kinds of ginger along with molasses, cloves, white pepper, nutmeg, and cardamom. They are spicy (and a little hot actually)!

The first time I made these cookies, I bought candied ginger from the spice section of the grocery store. This made them just about the most expensive homemade cookie on the planet. Since then, I have purchased candied ginger in bigger bags online from Oh! Nuts, King Arthur Flour, and Amazon and have been pretty happy with the savings.

You will need a scalloped 3 1/4 inch round cookie cutter, although a biscuit cutter or a plain round cookie cutter would work in a pinch.

homemade gingersnaps

Yes, I know. Sixteen ingredients. Make them. You won't regret it. They are that good.

Homemade Gingersnaps


Makes about 20 to 24 cookies

Ingredients

10 ounces (2 cups) all purpose flour
2 1/2 ounces (1/2 C) whole wheat flour
1/2 tsp Kosher salt
2 T plus 1 tsp ground ginger
Generous 1/4 tsp ground cinnamon
1/8 tsp ground cloves
1/8 tsp ground white pepper
1/8 tsp ground nutmeg
Scant 1/8 tsp ground cardamom
8 ounces of unsalted butter, at room temperature
5 ounces light brown sugar (about 3/4 C lightly packed)
2 T honey
4 T unsulphured (not blackstrap) molasses
2 ounces finely minced candied ginger
2 tsp fresh ginger puree. Can be made with a Microplane or purchased
Sparkling or granulated sugar for sprinkling on the cookies


Instructions

  1. Whisk the flours, salt, and spices in a bowl.
  2. Mix the butter and sugar in the bowl of a stand mixer with the paddle attachment on low for about 5 minutes, until fluffy. Mix in the honey and molasses until fully incorporated.
  3. Mix in the dry ingredients in thirds, beating each time until just combined.
  4. Add the candied and pureed ginger and mix until just combined.
  5. Form the dough into a disk and wrap in plastic wrap. Refrigerate for 30 minutes and up to two days.
  6. Preheat the oven to 350 degrees F.
  7. Roll out the dough between two pieces of waxed paper to 1/4 inch thick.
  8. Cut the dough into 3 1/4 inch rounds with a scalloped or ruffled edge cookie cutter.
  9. Place the cookies on a parchment lined baking sheet.
  10. Gather up and roll out the scraps and cut more cookies.
  11. Score the cookies at about half inch intervals (no need to be exact) with a toothpick or cake tester and very lightly sprinkle them with sparkling sugar or granulated sugar. 
  12. Bake the cookies, one sheet at a time, for 10 to 12 minutes, until brown. Make sure they are fully baked so that the cookies will be crisp. 
  13. Cool the cookies on a wire rack.
  14. The cookies can be stored up to two weeks in an airtight container. These cookies freeze quite well. 
Sometimes it can be difficult to remove the cookies from the was paper without messing up the edges. What works for me is cutting the cookies on top of the wax paper, placing another piece of wax paper on top of them, flipping the whole thing over, and peeling off the top piece of was paper. Because they are not attached to the (now) bottom piece of wax paper, they are easy to move.

Adapted with permission from Miette by Meg Ray. The book is exquisite.
homemade gingersnaps


HungryLittleGirl
Jan 8, 2013

Pizza with Onion Confit | Tuesdays with Dorie

Pizza with Onion Confit

This week, the Tuesdays with Dorie group is baking Pizza with Onion Confit. Confit you say! Yes I do.

This recipe was contributed by Steve Sullivan of the Acme Bread Company, and can be found on page 157 of Baking with Julia, a book based on the PBS series hosted by Julia Child.

The crust requires a "sponge," which is a mixture of yeast, water, flour, and in this case, a small amount of oil. While the recipe calls for using the sponge right after it rises, I put mine in the refrigerator for two days. It seemed to behave just fine, and made making this pizza less of a marathon.


I also made the onion confit two days in advance. It is an amazing mixture onions, pepper, sugar, red wine, thyme, red wine vinegar, and a dash of creme de cassis. I didn't have any creme de cassis, so I used Chambord.

On baking day, the recipe calls for adding more flour and some salt to the sponge, letting the dough rise for an hour and a half, rolling it out to a thin round, and then topping it with the confit and anything else that you would like. I topped mine with hunks of mozzarella cheese, bits of cooked thick pepper bacon, and Italian seasoning. The pizza is baked on a stone in a very hot oven.

This pizza was amazing, and the dough was very easy to work with. I did have to bake it a bit longer than the recipe called for as the crust stayed quite pale on top (it was nice and brown and crispy on the bottom.)

What would I do differently next time? Maybe add a little barley malt to the dough so that it would brown, and brush the outside crust with olive oil. Other than that. Not a thing. So good. Worth the wait.  And the onion confit is amazing.


Those of us who are participating in this group have agreed not to publish the recipes, and to refer you to the host kitchen of the week. You will be able to find the recipe over at The Boy Can Bake. You can view other participants' results (and delicious topping choices) on the Tuesdays with Dorie roundup.
Jan 5, 2013

Toffee & Chocolate Chip Shortbread Cookies | Heath Bar Cookies

These Toffee and Chocolate Chip Shortbread Cookies are made from a not too sweet shortbread dough (only 1/2 cup sugar per three dozen cookies) and then studded with mini chocolate chips and toffee bits. Then they are dipped in semi-sweet chocolate.

Toffee and Chocolate Chip Shortbread Cookies #cookies #chocolatechip #toffee #heathbar

The subtle hint of espresso in the vanilla shortbread, along with the chocolate chips and salty Heath Bar toffee chips combine together to make a cookie that both kids and grown ups in you life will love.
Jan 1, 2013

English Muffin Bread

English Muffin Bread

Sometimes you just want bread right now. This bread is perfect for those times. Most of the ingredients are probably in your pantry, and you will have bread in a hour and a half with a "hands on" time of less than 15 minutes.

This bread is full of holes, just like good English muffins, and makes excellent toast.

This month's theme for Twelve Loaves is "clean slate - starting the year with simplicity." I present to you one of the simplest breads around. Unlike no knead bread, it does require mixing, but also unlike no knead bread, it does not require two rises and a long wait. This bread is more about immediate gratification.

English Muffin Bread

Adapted from King Arthur Flour. They have some great step-by-step photos and notes on their blog

Ingredients

12 3/4 ounces unbleached all-purpose flour
1 T sugar
1 1/2 tsp salt
1/4 tsp baking soda
1 T instant yeast
1 C milk
1/4 C water
2 T oil
cornmeal or semolina to sprinkle in the pan


Instructions

  • In the bowl of a stand mixer, or a large mixing bowl, add all of the dry ingredients except the cornmeal, and whisk to blend. 
  • In a microwave safe bowl or large glass measuring cup, combine the wet ingredients and heat in the microwave until it reaches somewhere between 120 to 130 degrees F. An instant read thermometer is really helpful here. 
  • Add the liquid to the dry ingredients and beat at high speed for one minute.
  • Spray or grease a 8 1/2 x 4 1/2 loaf pan and sprinkle the sides and bottom with the cornmeal. 
  • Scrape the dough into the pan and smooth the top. 
  • Set the oven to 400 degrees F, cover the dough with oiled plastic wrap, and let rise for about 45 minutes to an hour. The dough should just crest over the pan's rim. 
  • Remove the plastic and bake the bread for 20 to 25 minutes, until the interior reaches 190 degrees F. 
  • Remove it from the oven and let it cool in the pan for 5 minutes. Turn it out onto a cooling rack and allow to cool completely. 
Simple, right?